Today I received my complimentary issue of Jewelry Affaire magazine for having one of my necklaces published. This is the Winter 2014 issue to be on newsstands in January.
I had made this mini book necklace...
I used a copper etching technique for the book cover. It's always a thrill to see my work published - I love all the Stampington magazines and feel blessed to be part of their work!
On another note, in a previous post I mentioned that I helped coordinate a Character Construction collaborative calendar for 2014. We had a different artist create each month's page. I have another peek of the calendar pictured below - the page I created for March...
The calendar is 5"x5" - a great size to carry with you. In January, I'll reveal all the months!
I hope you all had a wonderful Christmas with family and friends.
Happy Holidays from our family to yours!
Thursday, December 26, 2013
Sunday, December 22, 2013
My Handmade Christmas Card
Most of my Christmas cards have been sent out, so I think it's safe to show the finished card...
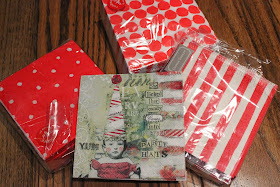
Thanks to my friend, Laura Himm, who gave me the adorable paper napkin with the girl, that I was inspired to create these cards. As soon as I saw that napkin, I immediately knew I had to use it somehow for my Christmas card. The napkin is a design from Sally Jean, you can purchase from here: Gray Mouse. I purchased other coordinating paper napkins from HomeGoods and I was all set to come up with a design.
Then I used Mod Podge and adhered all the napkins to a piece of card stock.
I stamped Merry Christmas on some ledger paper and punched out some green leaves for an accent.
I then stitched around the border of the card with black thread on my sewing machine. Afterwards, I finished by doodling some white accents with my favorite BIC white correction pen and added a couple of rivets at the top so I could add some black and white twine. I hope this inspires you to use paper napkins for one of your projects!
On another holiday note, I just love this last video my daughter posted on YouTube: How to Make Peppermint cupcakes and Candy Cane stands...so festive looking!
Thanks to my friend, Laura Himm, who gave me the adorable paper napkin with the girl, that I was inspired to create these cards. As soon as I saw that napkin, I immediately knew I had to use it somehow for my Christmas card. The napkin is a design from Sally Jean, you can purchase from here: Gray Mouse. I purchased other coordinating paper napkins from HomeGoods and I was all set to come up with a design.
Below are the steps I took to create the card. I cut up the napkins into strips and separated each napkin into a single ply. The napkins are actually made of 3 layers, you want to discard the 2 blank layers and use the single layer that has the printed image...it's very thin and transparent.
I used dictionary paper for the background.Then I used Mod Podge and adhered all the napkins to a piece of card stock.
I stamped Merry Christmas on some ledger paper and punched out some green leaves for an accent.
I then stitched around the border of the card with black thread on my sewing machine. Afterwards, I finished by doodling some white accents with my favorite BIC white correction pen and added a couple of rivets at the top so I could add some black and white twine. I hope this inspires you to use paper napkins for one of your projects!
On another holiday note, I just love this last video my daughter posted on YouTube: How to Make Peppermint cupcakes and Candy Cane stands...so festive looking!
It's countdown to Christmas...I can't wait! Merry Christmas everyone!
Sunday, December 15, 2013
Cookie Contest & Other Bits...
My office had our Annual Cookie Contest this week and I'm proud to say I won for the most popular vote and judge's Best In Show! Below is a picture of the cookies that I submitted, I called them "Almond Bark".
It's a recipe my sister Frances got from her friend which I tweaked a bit. It's personally, my new favorite dessert and I wanted to share it with you, too! Hope you like it.
Ingredients:
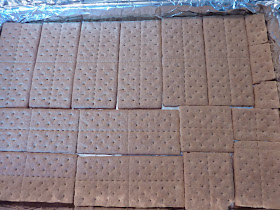
2 packages graham crackers
1 1/2 cubes of butter
1 lb of chopped raw whole almonds (I buy mine from Trader Joe's)
1/2 cup sugar
1/4 cup semi-sweet chocolate (for drizzling on top)
Line 16.5" x 11.5" jelly roll pan with foil.
Place graham crackers end-to-end to cover the entire surface.
In medium saucepan, melt butter and mix in sugar until thick, like pie filing - approximately 3 minutes.
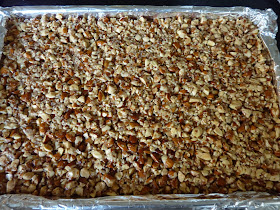
Mix in chopped almonds.
Spoon/spread almond mixture over graham crackers.
Bake 15 min at 350 degrees.
Cool completely. Drizzle with melted chocolate if desired.
Break into bite size pieces.
I hope you'll try this recipe! If you like almonds, you'll love this one!
Today, I was able to sneak out for a few hours and take a Copic Marker Technique Class at Scrapbook Territory in Berkeley. It was fun to attend a class and have some time to just sit and play. Below are the cards I made in the class.
The stamps the teacher used are from Stampingbella, the Uptown Girl collection - such fun images to color. I ended up buying these stamps from her too...
And if you haven't been to 4th street yet this holiday season...you must check it out. They've deck out the streets in tons of lights...
This month I was also busy coordinating a 2014 collaborative calendar for Catherine Moore with 13 wonderful artists. Each artist created a page for each month and Catherine designed the cover. This time we sent our images to a vendor to produce a professional 5"x5" spiral bound desk calendar. I want to show you a sneak peek, the wonderful cover created by Catherine. I will be able to order some extra calendars if you're interested in purchasing. I'll show more of the calendar pages in upcoming posts...stay tuned.
Can't believe Christmas is just a couple weeks away. Hope you're having a wonderful Holiday Season!
Sunday, December 8, 2013
Two New Journal Pages
Happy December! It's been a busy month, but I still happened to create a couple new journal pages recently.
Circle designs inspired from Roben Marie Smith. The two face images are from Invoke Arts. I created the images of the black bars myself from leftover rubber scraps after mounting some stamps...not bad huh? :-)
Circle designs inspired from Roben Marie Smith. The two face images are from Invoke Arts. I created the images of the black bars myself from leftover rubber scraps after mounting some stamps...not bad huh? :-)
This weekend, my daughter also performed in her annual Nutcracker show with her ballet class. Here's some of the costumes she wore...
 |
| This outfit is for the Spanish dance. |
 |
| This one is for the Snow dance. |
 |
| And this dress is for the Waltz of the Flowers |
And here's a small clip (40 sec.) of her performance...
It was such a wonderful show, it's so magical to see all the girls dressed up and dancing together. It's been so many months of practicing for this performance. I can't believe she's been in ballet for over 10 years now.
Hope you had a great weekend!
Sunday, December 1, 2013
Bird In A Bell Workshop & Bay Bridge Bike Ride
This weekend I had the pleasure of attending a workshop held by the wonderful artist, Nilufer Necef (Nily for short). The workshop was held in her beautiful home and we made adorable birds in a bell.
It's so much fun seeing how everyone's project turns out using the same materials. They each have their own personality and are so unique when you look at them individually.
It was fun catching up with everyone and creating in this inspiring atmosphere. Nily was so organized and generous and set up a beautiful table for us.
She also provided a delicious lunch...the food was great eye candy. It was all so delicious!
Below are some close up shots of the birds...
It was a great way to spend the day. Thank you Nily for hosting such a wonderful workshop!
Today was also a beautiful day here in the Bay Area. It was perfect for bike riding across the new span of the Bay Bridge. We went out with our friends and had a fun time getting in some exercise.
The ride took us just one hour round trip. It's about 2 miles in each direction.
Some spectacular views from this bridge...you'll have to try this one!
Hope you had a great weekend - happy December!
Sunday, November 24, 2013
My New Stamps & Sneak Peeks
This weekend I went to the rubber stamp convention in Newark, CA. I enjoy going to these stamp shows, seeing new products, and watching some of the demos. I especially like the Invoke Arts booth. I came home and couldn't wait to play with my new stamps...I created this little sampler.
I bought the following stamps...
I purchased a few sets from Invoke Arts and one set of washi tape stamps from Close to My Heart. I just love the washi tape stamps - I can now make the exact color washi tape I need with these stamps. Close To My Heart is sold in home parties, and this set was available as a Hostess Reward - luckily someone was selling theirs at the show.
I also love the mixed letters. The stamps are sold unmounted, so I did spend some time mounting them on cling foam and cutting them out individually. You can take the letters and spell out a word on an acrylic block, and then stamp the word repeatedly onto different papers.
I cut out the letters individually and mixed up the background papers and spelled out Artful Play and doodled this piece...
I then photocopied that piece and used it as wrapping paper for a small package I have to send out tomorrow.
Speaking of packages that I'm sending out, I can give you a sneak peek of what I'm been up to lately.
It involves products from Red Lead which they sent me...
and creating some samples from some really fun pieces...
There's so much you can do with these wooden houses.
They also sent me some adorable vintage collage sheets to use.
Below is a picture of a few of the houses that I worked on...
I'll be able to share all the details soon, along with the finished projects - stay tuned!
I have another sneak peak to share as well. I started working on my xmas cards...let me just say, "paper napkins."
I can't believe Thanksgiving is next week. I'm so looking forward to some extra days off. Have a great week, and hope you're spending time with your family and friends enjoying some yummy foods!


