Monday, December 25, 2017
Friday, December 15, 2017
Little Notebooks
Awhile ago I purchased a heavy duty gullotine cutter so that I could make notebooks with my mixed media art journal pages.
These are about 3" x 4" and fits perfectly into your purse, tote or backpack or a little stocking stuffer. :-)
These are copies of my art journal pages reduced in size. They're filled with plain white paper.
Message me if you're interested in adding one to your purse, $2 each plus shipping.
Happy Holidays!
Sunday, November 26, 2017
Anna Griffin Window Box Card
My sister Frances brought over an Anna Griffin card making kit she had bought. This card is so unique and so easy to make.
And look, it folds flat!
And it also includes the die cuts, so you can make more boxes after you use up all the supplies provided in the kit.
I added a Catherine Moore image peaking through the flowers.
And look, it folds flat!
This was our work in progress.
Anna Griffin's kit included everything you need and an idea sheet. You can purchase this from HSN.com.And it also includes the die cuts, so you can make more boxes after you use up all the supplies provided in the kit.
I added a Catherine Moore image peaking through the flowers.
And a vintage photo from Tim Holtz's collection glued to the front.
Here's the back/side view.
My sister Frances made a bday card for her friend and included pictures of her friend's grandchildren. It's just too cute!
I can't wait to try making another one and use the die cuts and my own papers.
Hope you had a nice Thanksgiving!
Sunday, November 19, 2017
Shaker Doll Tags For Sale
I'm on a roll with my shaker doll tags. Since I already had all the supplies handy and I have lots of hand painted faces on-hand, I cranked out lots of new shaker doll tags to sell.
I came up with an new option for punching the hole at the top. Before I punched the hole directly in her head/hair area, which I wasn't that happy with.
This time, I added these black flowers, stars and circles to the top of the head.
And fused around it.
I die cut small words to add to the dolls.
I came up with an new option for punching the hole at the top. Before I punched the hole directly in her head/hair area, which I wasn't that happy with.
This time, I added these black flowers, stars and circles to the top of the head.
And fused around it.
I die cut small words to add to the dolls.
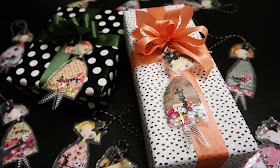
The tags look cute on a package and no two are alike.
Message me if you're interested in buying one, $2 each + shipping.
Thursday, November 9, 2017
We're Making Shaker Dolls & Tags
My sisters and I got together last weekend to celebrate some bdays and of course we always want to do a craft project. So this time, we made shaker dolls and tags. These are the finished projects.
We used the Tim Holtz vintage photos for those tags on the top row and for the dolls, I water colored the faces and my sisters added the bodies. They all turned out so adorable!
These are my sisters, so focused on creating. We're so fortunate to all live near each other and enjoy doing many of the same activities - crafting being one of them.
For my thank you notes, I wanted to keep with the theme and made shaker thank you cards. I started by making these tags.
I found that adorable doll image from an old doll magazine. I scanned it and reduced it to size. I added my signature metro tissue paper for the bodice.
I painted some blank white card with acrylic paint, making abstract marks.
I attached the shaker tags with washi tape and that was it, a shaker tag thank you card.
Enjoy the rest of your week!
We used the Tim Holtz vintage photos for those tags on the top row and for the dolls, I water colored the faces and my sisters added the bodies. They all turned out so adorable!
These are my sisters, so focused on creating. We're so fortunate to all live near each other and enjoy doing many of the same activities - crafting being one of them.
Prior to crafting, we spent several hours cooking our favorite dishes for each other.
We had a delicious lunch and spent quality time hanging out together sharing tips and tricks on cooking.I found that adorable doll image from an old doll magazine. I scanned it and reduced it to size. I added my signature metro tissue paper for the bodice.
I painted some blank white card with acrylic paint, making abstract marks.
Enjoy the rest of your week!
Sunday, October 29, 2017
My Black & White Pumpkins
Just a quick post to share my black and white pumpkins I made this weekend. I bought three plain black and white pumpkins on sale at Michael's. I couldn't wait to take them home to decorate - this is how they came out...
I used sharpie black and white pens and some acrylic paint. Finished it off with some bows and done. I'm happy with how they turned out. I think I'll buy some more to decorate.
This is how I bought them.
Happy Halloween!
I used sharpie black and white pens and some acrylic paint. Finished it off with some bows and done. I'm happy with how they turned out. I think I'll buy some more to decorate.
This is how I bought them.
Happy Halloween!
Sunday, October 8, 2017
Shaker Dolls Tags
I enjoy painting with my water colors and painting faces, the style I learned from Mindy Lacefield.
As I've posted in the past, I turn these faces into paper dolls. Well, I took it one step further recently and made the paper dolls into shaker tags.
Here's some photos of how I made the shaker doll tags. I use this fuse tool by We R Memory Keepers and a plastic sheet protector.
You heat up the tool and then you can roll the tip around the plastic to fuse the sheets together.
Leave an opening on one side so you can add the filler.
Trim the plastic around the doll.
These are some of the supplies I use to fill the tags with, different size sequence and beads.
I guess with all those faces I have cut out, I have lots of paper dolls and shaker tags to make. I'll have to take pictures once I have them all done.
Have a great week!
As I've posted in the past, I turn these faces into paper dolls. Well, I took it one step further recently and made the paper dolls into shaker tags.
Here's some photos of how I made the shaker doll tags. I use this fuse tool by We R Memory Keepers and a plastic sheet protector.
You heat up the tool and then you can roll the tip around the plastic to fuse the sheets together.
Leave an opening on one side so you can add the filler.
Trim the plastic around the doll.
These are some of the supplies I use to fill the tags with, different size sequence and beads.
I added an eyelet at the top so you can tie a string on.
These would make great tags on top of gifts.I guess with all those faces I have cut out, I have lots of paper dolls and shaker tags to make. I'll have to take pictures once I have them all done.
Have a great week!
Friday, September 15, 2017
Vintage Photo Box Art
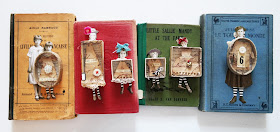
I'm still playing with Tim Holtz's pack of vintage photos, they're so fun to use since they're all cut out already. I made these six altered photo box art pieces below.
I used 6 vintage photos and found 6 small box lids.
I added embellishments to the dresses and stripped legs to the photos.
The last step was to cover the box lid with some printed transparency paper.
Here's some close up shots of each one.
It was a fun project, I hope I've inspired you to play with Tim's vintage photos and some box lids.
Have a great weekend!
I used 6 vintage photos and found 6 small box lids.
I decided to use the box lids as bodies.
Here's a few step by step photos...
I covered the inside of the box with some old text paper. I used kraft colored paper to cut out the dresses and crinkles them up and edged with brown ink.I added embellishments to the dresses and stripped legs to the photos.
The last step was to cover the box lid with some printed transparency paper.
Here's some close up shots of each one.


